This year is all about alien headpieces! First the lekkus, and now this.
I’m sure some of you have watched me on my facebook live videos while making this asari headpiece. I had a wonderful time! I’ve been able to download them, so I’ll upload them to youtube soon.
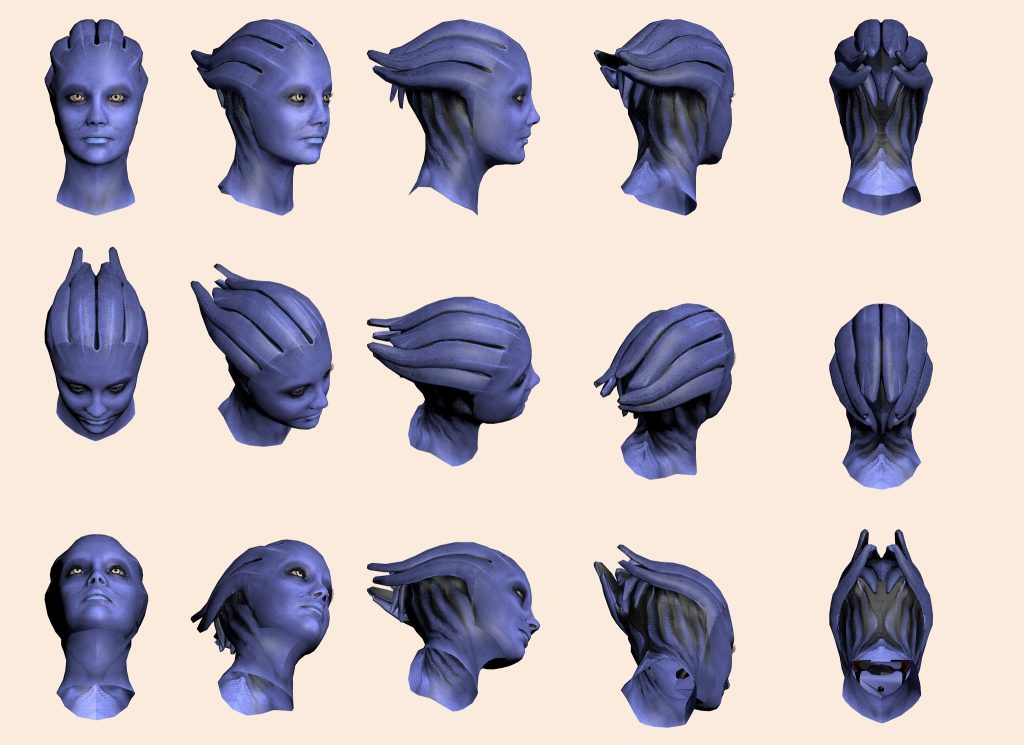
 |
| Source. |
Let’s go!
These are the materials I’ve used for this prop:
– Polystyrene mannequin head.
Tools:
– Sand paper.
– Brushes.
– A good microvawe.
I based myself in this wonderful tutorial by Emmabellish to make my own head. She made an amazing Aria costume. I skipped the lifecasting part, but the rest of the process is almost the same.
So instead of doing the lifecast part, I used a female mannequin head. I used the male head to make my lekkus and it was too big for me because, as I always say, my head is abnormally small. It was no big deal at that moment because I just put a dart in the nape and it was evetually covered with the diadem but asari heads are not covered on any part, so I had to do it as accurate as posible.
One of the reasons I dared to make my own asari headpiece because I think that if I bought one it would have looked ridiculously humongous on me.

My first contact with the hard clay was pretty lame because it’s super hard and I spent like 15 minutes of my life trying to cut it with several tools til I had the brilliant idea of looking in forums and I saw it can be heated in the microvawe. Then everything made sense and started working.
First of all I covered the mannequin surface for the clay to come to adhere. I also took the chance to make a neck.
Some of you have asked me if this clay is the same as the super popular Monsterclay and the answer is yes, it’s the same kind of material.


Once the base was prepared I started adding the back tentacles, that go over the nape. I did a basic preliminar shape, I tried it on and I used my loop tools to smooth them out and get the final shape. After putting them I felt they were too high so I ripped them off and put them in place. Because this is the process: shaping things, putting them in place, check it, fill where needed, smooth where needed and repeat till you get a satisfactory result.


After fixing the back tentacles, I started putting the rest of them along the head. I did a little mark where I wanted them to start on the forehead. Then I made some doughnuts, I put them in place, I fused them with the head and I shaped them with my modeling tools.


I think the most difficult part for me was getting the spatial relationship between the tips of the tentacles.I had to heat the tips with the heat gun and move them till I put them in a proportional heigth and distance from the rest of the structures. I don’t have pictures of this but I also put some wires inside the tips to avoid them breaking.


With the tentacles in place, I smoothed their intersections by adding some more hot clay and extending it between them. I also improved their shape by adding and removing where necessary.
I was ready to add some details on those buns, so I carved the grooves between them and I added a thin clay line on the top of each one as a little crest that I used as a guide to get that angular shape they have.


I added some more clay on the sides of each tentacle and then I shaped them with the loop tool till it looked like Lisa Simpson’s head.


To make the nape and neck relieves I followed the same procedure: I put some fritters, I stretched them, I added clay and I smoothed them out with the loop tool till I got the final shape.


And here comes the blowtorch! Comes out that the guys from the store listened to my streaming when I said I didn’t know how to get a smoother look, so they called me and gave me some useful advice. They told me I could use trementine or gasolina to melt it a little and smooth it out with a brush and I also had the option to use a kitchen blowtorch to heat the surface and even it with a brush too. So I bought a super cute blowtorch and I heat it littleb y little and smoothing everything out very carefully.
They also told me this plastiline can be sanded when its cold and hard, so that’s what I did. I used a 150 grit sandpaper to get rid of little lumps and imperfections.
Once the surface was finally smooth, I texturized it by using a couple fabrics: a thin tulle for a preliminar relief and then I used a mesh fabric to get that scalelike look.


And this is it for today.Next day I’ll tell you how I made the mold and casted the latex replica. Hope I can finish this cosplay before the Mass Effect Andromeda release date.
Hope you found this useful!! And feel free to ask in the comments below or in my social media.


