Henlo! I am addicted to Helldivers 2. Lately my biggest hobby is spreading DEMOCRACY around the galaxy, crushing bugs and destroying evil robots that come to tear down our way of life. In my brand new star destroyer, the Princess of Family Values, I meet afternoon after afternoon with my comrades and we rush to the battlefield, crossing the atmosphere with our hearts filled with patriotism and a desire for liber-tea.
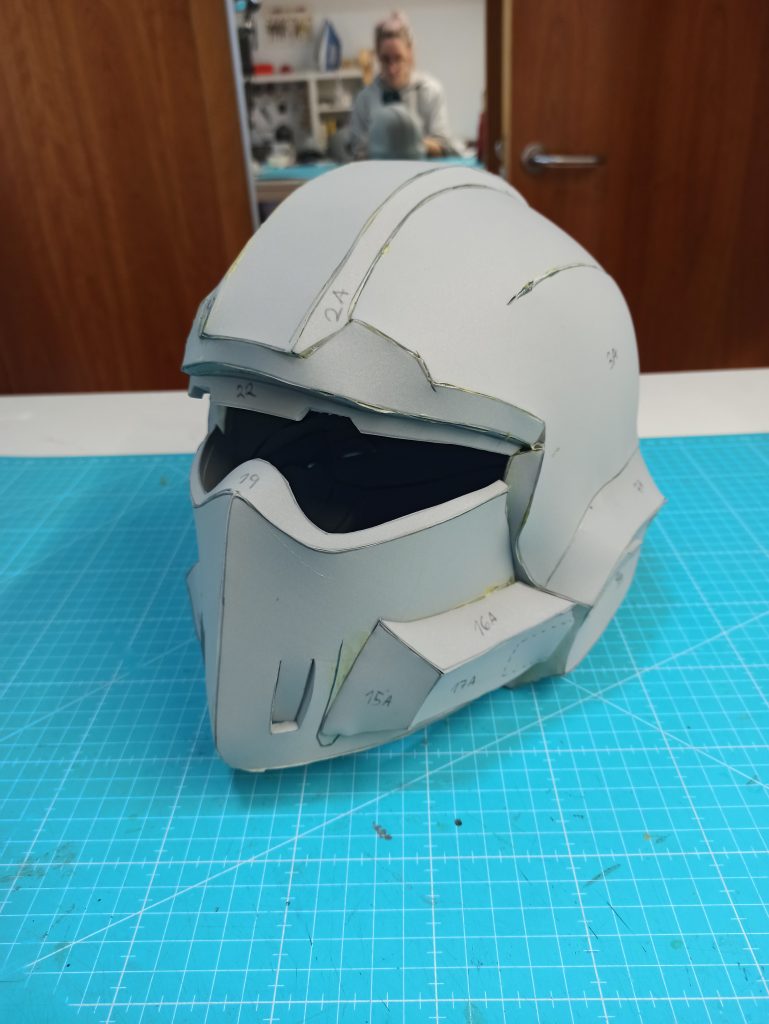
Every time I get hooked on a game, I have to honor it by creating something palpable with my own hands and this time I have relieved my creative cravings by building the B-01 tactical helmet to decorate my living room. For this, I have used the Pepakura files from Heroes Workshop , which has very kindly given me permission to make this tutorial with their product.
Initially I downloaded a 3D file of the aforementioned helmet, opened it with Pepakura and tried to prepare the file for craft foam myself, but I didn’t like the result. That’s when I saw that Heroes Workshop had put their files up for sale , so I threw away the shit I was making and got this quality material.
Heroes Workshop Files
When you open the file , you can see the complete helmet in 3D on one side and the 2D display on the other. In the latter you can see the unfolded pieces with numbered edges and, if we click on each of them, we can see which area of the 3D object it corresponds to. Likewise, only one side of the helmet has been deployed because it is mirrored and with these references we have more than enough.


What I want to say with all this nonsense is that these files are great for those of us who have some experience working with craft foam because Heroes Workshop already says it in each of their products: they are files with a modified unfolding for EVA rubber – I must mention that with excellently cleaned edges and surfaces – and they require knowing how to use a minimum of the Pepakura Designer software . It’s advisable to know how to scale, choose the paper format and move the pieces in the 2D panel. And most importantly: you have to have a certain skill when transferring the patterns to the final material because you have to visualize very well how you are going to join the pieces together.
But don’t go, I’m here to help!
Let’s see: in constructions like this it is highly crucial to sit in front of the model for a while, observe it and consider how each piece is connected to the adjacent ones. I already explain it in my book: cutting the edges of the EVA foam at different angles to create volumes is an essential skill and, in elements like this helmet, it is critical.
Timelapse.
Brought to you by
The majority of the helmet is made with Feroca’s 5mm EVA foam and there are a couple of 10mm thick pieces. The clearest example is in the piece seen in the next photo, where a protrusion occurs. The edge of the top piece must be cut straight, at a 90º angle and the fitting edge of this piece must be cut at a 45º angle outwards. In this way, by joining both pieces, that volume is created and the relief works. If it is not done this way and all the edges are cut straight, the edges will bulge and the shapes won’t be accurate.

If you look at the video, you can see how, every time I cut a piece, I put the paper pattern next to it. Precisely, what I am doing there is looking at my notes: on each of the edges I have noted whether they are 90º, 45º outward or 45º inward. And I don’t know this innately: before making the final helmet, I make a prototype to test this stuff. Most of them work in my brain, but there are some connections that are more difficult for me to deduce. And, so that you don’t have to think, here’s the cheat sheet!
- 45ºO: Cut 45º outwards.
- 45ºI: Cut 45º inwards.
- 90º: Make a 90º cut.


Now, with the Heroes Workshop file and my instructions, I think the work is infinitely easier. Once all the pieces have been cut with their edges at the corresponding angle, they will be ready to glue. And it is not necessary to cut at an exact 45º. There are tools intended for such use, like these from FoamWerks; But I do it at a guess and it works.
Most of the pieces in the original unfolding are quite good, but I have modified some to my liking through joints or extra parts. You can see these pieces united and colored in the cheet sheet.


Keep in mind that Pepakura is a software designed to create projects on paper, but when it comes to adapting it for EVA foam, we can allow small licenses, since this material has a certain degree of flexibility when heat is applied. Then we can ignore these tiny joints and simply flatten them and transfer the pieces to EVA foam with these irregularities.
When I glued the parts of piece number 3 together (which is also a union of several parts) I applied heat and shaped it with a plastic hemisphere so that it acquired that rounded volume. This can’t be done with paper, but it can be done with EVA foam!


Democratic conclusions
In short, the Pepakura files are a great help (and even more so if they are prepared by someone who knows how to adapt them), but you have to have certain notions and give yourself a little effort to create the model manually. It is not simply about cutting and gluing, but you need to develop the capacity for spatial visualization and plan the relationship that the different parts have so that the object looks well in our tangible world.
If you had any doubts about whether or not to get the Heroes Workshop files to make your own Helldivers helmet, I hope I’ve put them to rest!
Coming soon to your screens: details with fine EVA rubber, visor, paint and weathering.


