
Hi everybody! Are you learning a lot about photography? did you practice? or have you been sewing (like me) and you didn’t have time to practice? Having so many hobbies is exhausting.

Today I want to talk really lightly about the requirements you need to meet if you want to make a believable composition.
All of us have seen a million cosplay photomontages. From the simple ones, with altered backgrounds and a couple details, to pictures full of effects and perfect photoshopped bodies. Making photomontages is a really, really laborious task, a meitculous work that takes hours to learn and hours to apply and, if you disregard the most tiny detail you mess it up. I’ve done few photomanips and, judging for what I saw, there are four fundamental aspects we have to mind to make it look credible.
Perspective
The background and elements perspective must correspond with the subject, its position, size and angle. It would also be recommendable to take in account the kind of lens we used to take the cosplay picture to choose a background with similar focal legth and angle coverage (wide angle, regular, telephoto lens…) to match them together.
If the perspective doesn’t work in th picture, we will loose the spatial reference, it will look strange and, believe me, it will be really noticeable. Here you are an example of a picture I edited in which the perspective looks really awful.

Light.
It’s basic in every picture that the lighting of the elemets we’re combining is the same or similar. We can always use Photoshop ilumination filters, but it’s really important to make it look like the light source is similar in every part of the composition. This way we don’t need to use lighting postproduction effects that reduce the quality of the picture.
Tonality, brightness and contrast.
Color is a part of the picture intimately bound up with the light and the tonality of the whole picture must be consistent. It is related to the white balance (color temperature) and it’s crucial to creating ambience. Check out this tutorial (in spanish, sorry, but I think it’s understandable) to learn a very easy way to match the color of the subject with other elements.
In this regard, it’s also important to mind that the brightness and the contrast match between the different parts of the image. If you see that the black or the white tones of the background are deeper than the model ones (or viceversa), you’ll have to adjust it until they look similar.

Crop.
If we’ve done well all of the above but the subject is poorly cropped, we can forget about making a decent photomontage. A good crop is smooth, with no halos and without contamination from the original picture it comes from.
The most difficult element to crop is the hair. It’s really difficult, but it’s not impossible. Photoshop have plenty of tools to make complex selections, that helps us create a clean crop. I learnt watching this tutorial (in spanish again).
For instance, in this picture I edited, there’s a noticeable halo around my left arm. If you look closer, you can see a thin white line surrounding it. That’s a halo and it looks awful. It’s better to crop some extra pixels than to leave visible halos.

I think the best way to achieve a nice photomontage is to plan the image before taking it. It’s way easier to prepare a background (either photographed or made by us or a stock one) and surrounding elements of the picture to, eventually, take the cosplay picture, than taking the cosplay picture and looking for resources to match it. If we previously have an idea and some components of the pic, it will be much easier to calculate the perspective and the lighting we need. This is not indispensable, but saves us some time and effort.
Also, if we don’t know how we want our photomontage, it’s always better to take the cosplay picture with a soft lighting than a hard one, because this one creates notable shadows.
 |
| Original image. |
 |
| Our picture using the bench as a reference for the railing perspective. |
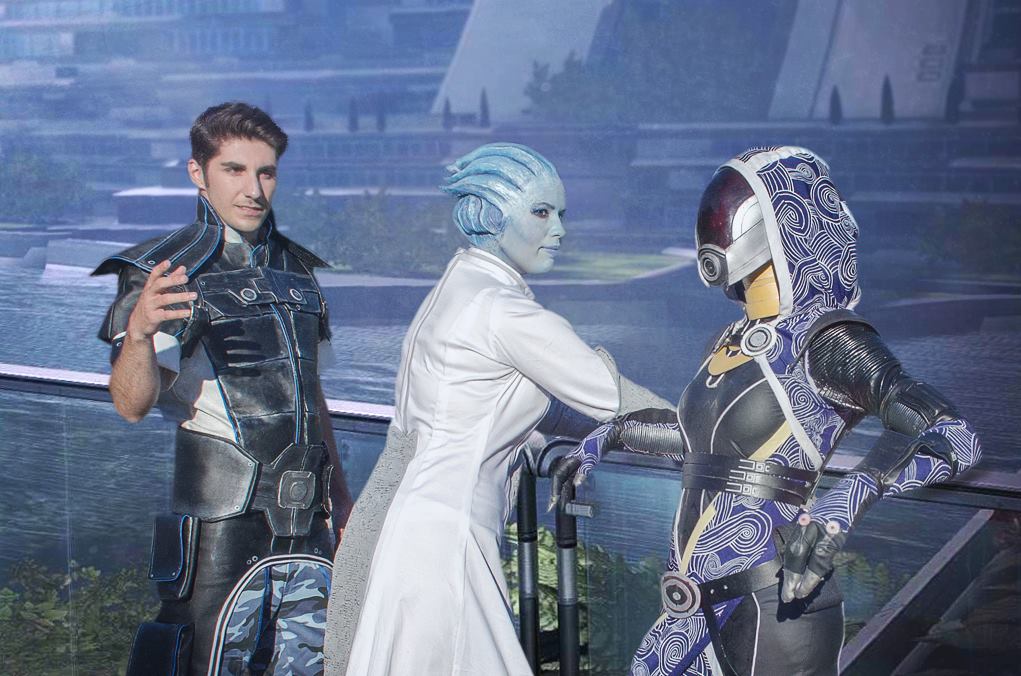 |
| Foto editada/ Edited picture. |
*Sumyuna as Liara and Sender as Kaidan.
I’m excited I still have a lot to learn!! Something I have to practice is to integrate feet on grounds. People look like they’re floating in my pictures and I find it pretty difficult to make it look realistic. If anybody have an advice, I’ll gladly take it.
Ill keep on practicing! I’m such a begginer, just as you guys. Maybe I just I know half a lesson forward than you and the journey looks long, but I hope this posts encourage you to keep on trying new stuff.
Practice a lot and train your eyes! Here you are two versions of a Tali photomanip I did (pic taken by Hidrico). I first made the red shots one but I tought a cooler color would look better in a Mass Effect picture, so I ended up turning them into blue.


Good luck everyone and thanks for reading!


