Hello everyone! Today I wanna talk about my 3D printer and how I get by with it.

First of all, I wanna thank very specially Dranosh for encouranging me to buy it and for giving me good advice. I wouldn’t be able to use it without him.
And he does commissions, ask him!
It’s funny because a couple years ago I was pretty reluctant to use this technology applied to my costumes, I used to say it was cheatig (I thought the same abour Pepakura and now you see me). But, once I started learning about it, I saw the work behind printing stuff and I saw that, if it’s true that it saves some manufacturing time, the 3D modeling process and finishing the pieces can be intrincate.
So now my opinion is: do what you want as long as you’re true to yourself and don’t lie if you apply to a contest. Period.
Welp, I`m beating around the bush and what I want is to give you some advice and guidance in case you’re thinking about buying a printer and share my knowledge with you to solve your doubts.
So let’s go!

Last summer I bought the Creality CR-10 printer through GearBest and I’m very happy with the purchase and their service.
Back then I watched lots of reviews and this printer in special was pretty well rated. Maybe now, some months later, there is some other new and better machine that I don’t know about but I can tell you I’m happy with how mine works. It’s about 350$ (depending if there are special discounts or not) and, for this price, it’s a real bargain.
It takes about a month to get home as it comes from China, but the customer service is really good.
This printer can be considered a semi-DIY, as you don’t have to assemble it from scratch, but it comes partially disassembled. It’s not a pretty machine, doesn’t have a cover/box, you can see its mechanism and the finish is not visually atractive. It’s a practical design and it’s capable of making pieces up to 30x30x40 cm, so it’s quite big to be a desktop machine.
Once you unbox it, you’ll have to assemble its frames and plug it. In a couple hours it’s ready to print. Tools and everything you need is included in the package.
Once you assemble it, you have to calibrate it, that is adjusting the bed leveling to have an even and horizontal printing surface.
Once more Dranosh recommended me following this video to set it in motion (and check out the full channel, ’cause it has nice tutorials about this printer). It’s not an intuitive process for someone who has never used a printer before, but following the instructions in pretty easy.
The bed, the glass that comes as a printing surface, can be prepared in different ways for the plastic to get stuck to it and have a nice print. Wrapping it in tape and applying some hairpray on it is what works better for me.

The Creality CR-10 printer comes with a PLA filament roll and a microSD card with a preloaded file (a cute cat) for you to print as soon as you turn it on. It also comes with the Cura software as print manager. In most cases the file is corrupt and the cat comes out beheaded (you can download the fixed file here); but with this first print you can see the quality this machine achieves and it’s fantastic.
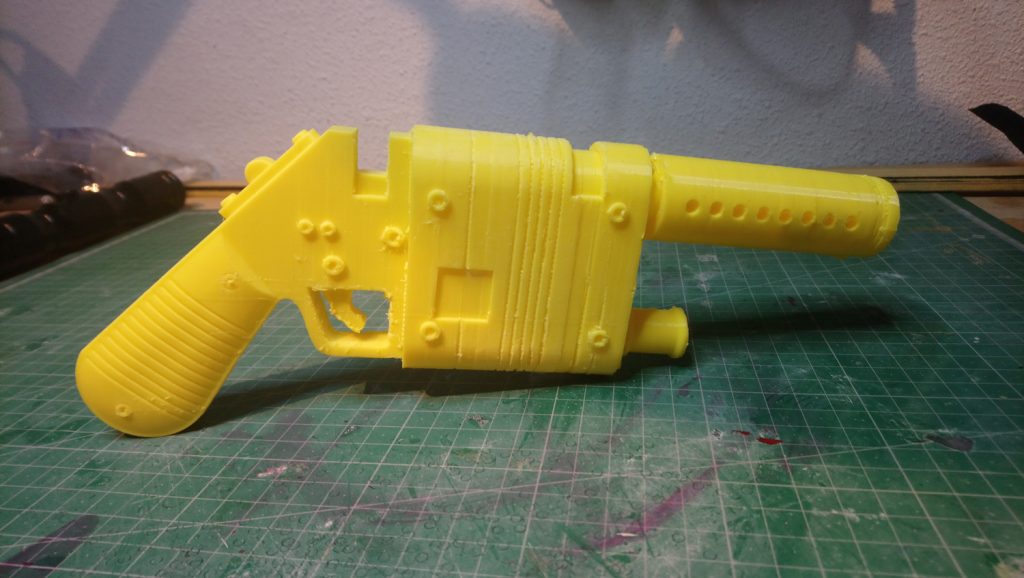
After using Cura a couple times I didn’t like it and I dowloaded Slic3r, which I think is a more complete and easy to use program. I studied this tutorial to learn how to configurate my prints. Here I’m showing you the presets I use to print weapons.


When I want to print stuff like jewels or small parts, I prefer adding some more infill material and more solid layers outside for them to be more resistant. The good this is Slic3r lets you save different presents for different prints.


Another interesting thing is you can load more than one element per print and arrange them on the bed, previsualize them and rotate them to print several pieces ta once. I don’t know how many kinds of files this software reads, I always load .STL files which are the most common ones. No matter if I sometimes buy or download files online or if I make them. Once everything is arranged on the preview, you just have to click on “export G-code”, you save it on the microSD card and it’s ready to be printed.

Last but not least, I’d like to tell you about Fusion360, which is the software I use to make my 3D models. It’s curious because people use to say it’s a prretty messy program if you’re used to other 3D modeling aplications, but it’s very intuitive for total beginners like I was. You can download it here and it’s free for 3 years if you’re a student (or if you say that you are, you kow the drill).
The learning curve is kind of frustrating as the basics are kind of difficult to get. Leraning how to use the interface is complicated. But, once you understand how the basics works, you can do cool stuff.
Once you know how to sketch, give volume to your creations, put some details and embrace the modeling environment, everything goes smoothly.
I highly recommend you to watch Lars Christensen’s videos. He has the clearest explanations I’ve seen online. He talks about a lot if onteresting processes from the basics to the most advanced techniques. Though I personally think he lacks of a super basic walk through the software basics (that is what I found more difficult to learn). In fact I’m thinking about doing some youtube videos on this subject because there are some super stupid tasks that are not very intuitive to go trough when you first start Fusion360.

Espero que os haya servido este tocho. Como siempre, no dudéis en dejarme por aquí o por mis RRSS vuestros comentarios.
¡Muchas gracias por leer!
And that’s all. Here you have all my knowledge after 6 months of 3D printing. I discovered I enjoy modelling very much, it’s so much fun!! And I love going to work or going to sleep and leave the printing at home working for me. Between this and that now I baste using pins, omg, my productivity rate has increased quite a lot. Yay!
Hope you found this pist useful! As always, feel free to leave some coments here or on mi social media.
Thanks for reading!

