
Hey! I’ll keep on making cosplay tutorials, I promise. But today I want to talk about the photography equipment I’ve been purchasing throug this last year I’ve been taking pictures. I want to make this mainly for you to see you don’t need the most expensive camera to get decent results. Although, of course, I spent some money on it.
I want to talk about my equipment today because I feel I’ve got to a point where I’m pretty satisfied with it and I feel I don’t have to buy anything else to take the pictures I want to take. My last purchase was the third flash a couple months ago and I stopped there.

When I get involved in a new hobbie, I try to acquire all the equipment posible. I don’t like working in a crappy way, I don’t like to waste my money either. I just try to have all the things neccesary to work comfortably. I value comfort and practicality over all things and always thinking about achieving a minimum level of quality.
So let’s see my equipment and its features. I bought 99% of it on Amazon, so I’ll leave links for everything and I’ll be very grateful if you guys bought through my links as I’d get a small percentage of your purchases. (The links in english go to the amazon.com site).
 I think it’s the only thing I didn’t buy on Amazon and I bought it right before being discontinued. Back then the D3300 model just came out in the same vein: powerful but simple and very easy to use cameras. Perfect for beginners!
I chose the D5100 model for two reasons: its price, cheaper tan the new model, and also for its 16 megapixel sensor instead of the 24mp that the new line was offering because my computer at that moment wasn’t going to be able to run them.
The megapixel amount is not so decisive of the image quality in these cameras and, for cosplay pictures, 16mp are more tan enough. The megapixel amount is indicative of how much you can zoom a picture without loosing sharpness. Cosplay photographers mainly work with small formats and we want to upload our pics on the internet, so 16mp work fine.
The important elements that bring quality to a picture are the sensor and the lenses we use. The sensor is crucial when it comes to choose a good camera as it’s the sensitive element that receives the light that shapes the photograph. In my camera it’s a CMOS – the most extended technology, very reliable in image quality and color features – in DX format. That means its size is 23,6×15,6mm. This is a smaller format tan the full frame one, that is the one that brings the highest quality, but it increases exponentially the prize of the camera (we’re talking about thousands of euros) and, once again, for the performance we need as beginners, DX is quite good.
It is also important to take notice of the ISO sensitivity of our sensor, that is the amount of light need to take a picture. The higher the sensitivity, the better possibilities we’ll have when it comes to take low light condition pictures. My camera has a sensitivity from 100 to 6400 ISO, that is very, very nice. I haven’t exceded 400 ISO and I used that option to take pictures at the Star Wars Celebration without flashes.
In cell phones megapixels are important because their sensors are pretty tiny, so they have to take the photo resolution from somewhere. But in reflex camera formats megapixels take a seccondary place.
Something to have in account, though is not so important because it’s almost the same in all DSLR cameras, is the high speed synchronization of the shutter with flashes. The shutter is an element consisting in leafs that open and close at certain speed letting the light pass to the sensor the time we consider neccesary. The Nikon D5100 camera has a maximum high speed sync of 1/200 (0,004 milliseconds). This means that, if we take a picture with flash in a higher shutter speed, the shadow of the leafs will appear in the picture.
And what is the solution if this happens? To increase the ISO value. And that’s why it’s more important to choose a sensitive sensor than a faster shutter.
 |
| Source. |
Once again, the higher the shutter speed is, the more expensive the camera is and we don’t want that. But it’s good for you to know why.
Another aspect I had in account when I bought my camera was the foldable screen. It’s silly, but as I take a lot of self-portraits, it was important for me.
Lenses
– Nikon AFP VR 18-55mm f/3,5
This is the lens the camera kit included. It’s not big deal, but it works fine. Ranges from 18mm (slight wide angle) to 55mm (normal angle). It’s a polyvalent ordinary lens, but it’s not an optic wonder.
AFP means auto focus and VR means vibration reduction, which avoids pictures to appear blurred when taken with low shutter speeds.
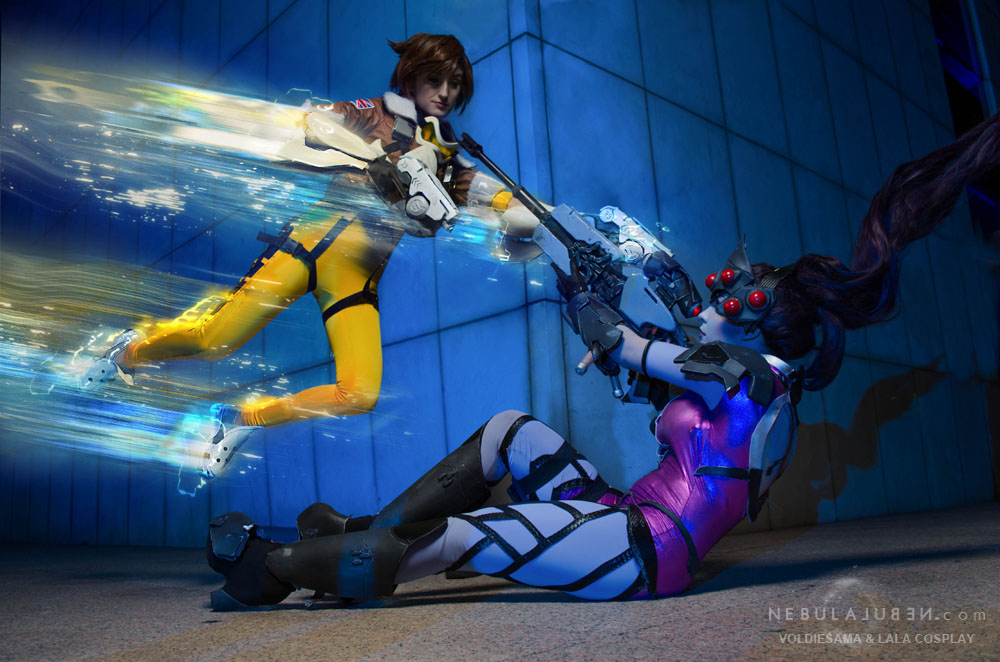 |
| Cosplayers: Lala cosplay y Voldiesama.Foto tomada con 18mm. |
– Nikkor AF-S 50mm f /1,8G/ (International link)
This is my particular jewel. I already was told about it by Cameko Sam and El Niño Mutante back then when I didn’t know what to buy.
This is an AF (autofocus) lens with 50mm fixed focal length and with the amazing feature of its f/1,8 aperture. When a lens has this kind of diaphragm aperture it’s said is a fast lens and it allows to take cool pictures in low ambient light conditions. (or with no need to use powerful flashlights). And, besides that, the greater the aperture, the lesser the depth of field. This means the objects around the subject will appear beautifully blurred.
The aperture of a lens is one of the things that makes it expensive. It’s quite an expense, but it’s worth it. And, of course, if you want a good lens to start with, this 50mm f/1,8 is the right choice.
 |
| Cosplayer: MeFoto tomada con un 50mm.
Iluminación con reflector / Illuminated with reflector. |
 |
| Cosplayer: Thélema TherionFoto tomada con un 50mm.
Iluminación con reflector/ Illuminated with reflector |
– Nikkor 55-200 VR f/4
This lens also came in the camera kit and I almost don’t use it. Its focal length ranges from 55mm to 200, that is telephoto lens.
As we get to the thelephoto values, the depth of field gets reduced so you can achieve that cool blur around the model and you can get similar effects to the 50mm with fixed focal to take close up portraits. But you’ll never get the spectacular quality of the aforementioned because this one has a maximum aperture of f/4 so you’ll have less lighting possibilities.
I won’t even put a link to it.
Keep in mind the angle that lenses reach is not the same with full frame (FX) sensors than with DX sensors like the one in the Nikon D5100 camera. Their naming doesn’t change because the optics is the same, but, as the DX sensor is smaller, a 50mm becomes a 70mm aproximately. And that happens with all the lenses.
 |
| Source. |
Reflector 5 en 1 de 110cm de diámetro/ 5 in 1 110cm reflector.

This was one of my first purchases after buying my camera. Before flashes, before anything. A reflector is very cheap and it bail us out when it comes to illuminate our subject and we don’t have other resources. And, of course, it comes in very handy to supplement flashes in different situations.
This thing is very versatile and consists in a foldable white translucent fabric that you can use as sun shield or difuser in sunny circumstances. It also has a reversible cover that has a black and a white face – to neutralize lights or reflect them smoothly respectively – and another Golden and silver faces to poewrfully reflect in a hotter or colder tone. A reflector is essential and the bigger, the better.
I also use the white and black parts of my reflector as a background for close-up portraits.
 |
| Cosplayer: SumyunaFoto iluminada con reflector/ Illuminated with reflector |
Flashes

I have three flashes from the Neewer brand. I first bought the kit with two flashes, their shutters and some other little stuff. And a couple months ago I bought the third flash and a set of extra shutters. This brand is pretty cheap, but it works very well. I haven’t had any problem with these gadgets so far and they’re good enough to take decent pictures.
The shutters are operated by radio waves so, unlike other kinds of shutters like the infrared ones, it doesn’t matter if they’re facing each other and climatic conditions don’t affect them to receive the signal correctly. I’ve modelled in lots of cosplay photo shoots and I’ve seen photographers strugling with their shutters, but I still haven’t had any problem with them.


The most important thing you have to take in account when yo buy flashes is their guide number (GN), taht is the reference we use to value its power. The higher the GN, the farest its glance reaches giving more lighting possibilities. These flashes GN is 58.
GN= Distance from the sensor to the object x apertura (always in ISO 100).
You can see how it Works in this chart and here’s a link to the GN calcuator. As you can see, with a GN 58 we can illuminate up to 14,5m with a f/4 aperture, which is very nice.
Don’t be afraid, when yo get used to using flashes you don’t need to calculate anything. I shot intuitively, but it’s good to know the intrincacies of the flash lights functioning.
 |
| Source. |

Light modifiers
Light modifiers are elements that act altering the light quality, that can be softer or harder. The light that comes directly from the flashes is pretty hard, it creates sharp shadows that are maybe unwanted. So we can use light modifiers to soften it, to get a balance of lights and shadows more fuzzy and subtle.
There are also modifiers to harden the light, but I haven’t used them yet.
 |
| Cosplayer: Adrian WintersLuz de flash sin modificadores/ Raw hard flash light. |

A very basic and practical gadget. It helps softening the light although it makes it bounce in every direction, so we can loose control of it in some situations. Mainly in the studio or in little rooms. I mainly use it when I soot outdoors.
But, well, it costs 10$ and it’s always good to have one in our backpack.
You can also find it in other formats such as opaque or with a silver interior.
 |
| Cosplayer: SumyunaIlluminated with umbrella. |

This has been one of my latest purchases and I couldn’t be happier with it. In contrast to the classic white umbrela, this softbox is closed, so light can’t bounce in every direction and it comes out more concentrated making us able to control it better.
It’s lined with a silver fabric on the inside, to boost the flare and it also comes with a translucent white fabric to diffuse light and make it smoother. I use it with the fabric 99% of the time because I like to aim the light to my models but I also like to get smooth shadows.
This is another gadget that works better if it’s bigger.
 |
| Cosplayers: Sumyuna y SaeFoto iluminada con Octabox/ Illuminated with Octabox. |

– Anillo difusor/ Ring flash diffuser
This gadget is ideal for close-up portraits. The light comes out directly to the face in different directions, so you get a super smooth and flattering result with little shadows. I love it because I have hard features and it helps me conceal them.
You can see how it looks in the picture below. You can also see the ring reflected in my eyes. This is a very silly trick to know how a potrait is illuminated. The cheat sheet of the lighting scheme is in the eyes of the model.
 |
| Foto iluminada con anillo. |

I love using color lights. In fact, I purchased them with the flashes. I obviously don’t use them in all my pictures but they work pretty well in a lot of cases. They’re useful to create cool atmospheres and make the scene look surreal, different.
You can also use them to compensate ambient lights but that’s more complicated. I use them to create crazy fantasy effects.
In my experiece, they work pretty well supporting a main white light on the model. Color lights look amazing in the background, cutting out their silhouette and filling shadows.
They come with a case and a rubber band to attach them to the flashes.
 |
| Cosplayer: VoldiesamaIluminación frontal con Octabox/ Frontal lighting with Octabox.
Apoyo con flashes de colores azul y fucsia a los lados/ Supported by two coloured flashes on the sides. |
Supporting elements
– Flash tripods and flash brackets.
You can always use your friends for this task, but a couple flash feet come in very handy and can spare untold suffering to your loved ones.
Flash feet need flash brackets to attach your gadgets. There are very simple ones, like the one that get attached to the flash mount, but I prefer the Bowens ones because they hold them better without ruining the original flash mount. They’re also more comfortable to use and they serve as support for Bowens softboxes.
All flash brackets have a little hole to attach the umbrela.


I barely use it but I have it. It’s a gadget that adapts to the reflector and gets attached to the flash foot. It makes it easy to aim it to the model. I mainly use it when I take self portraits at home because it’s kind of unstable and wind can blow it outdoors.
This time, if you wan tot use a reflector, is way better to ask a friend to do it for you.

As you may have imagined, I totally need this gadget because I use it to take my self-portraits. In fact, you can see it in my hand in the picture below. I didn’t Photoshop it because I found it funny it looked like a detonator. Brilliant or stupid, you decide.
It’s not only commendable for selfies, but it’s also very handy to take long exposure pictures on a tripod to avoid taking blurred pictures.
 |
| Cosplayer: MeIlluminated with umbrella.
The background is a white fabric illuminated with a yellow flash gel. |
 – Tripod
I also use it a lot to take my self-portraits. Just like the remote control, I use it to set the camera to avoid taking blurred pictures.
I have a very basic and short one (its maximum length is 1,40m), I wish I had a taller one, but I kind of do with it.
And that’s it! This is all my equipment. With this and a little ability with Photoshop, I take the pictures I take.
In a few months I’d like to but a wide angle lens to cover the entire optic spectrum and because I can get amazing effects with it. It’s quite a whim. But, I can do with what I have now.
Hope you find this useful!!
*I want to thank my friend Teco (the first photographer that took cosplay pictures of me) for reading this article and helping me with some corrections.


